Installing PHP software can be a daunting task for creative individuals like myself. I have a degree in visual arts and I am not a programmer by trade. However, over the years I have learned it is not a bad thing to dabble in this dark and mysterious craft. If you can learn Photoshop and Flash Action Script, then you will have no problem installing a simple PHP script.
The following tutorial assumes you are using a Linux based hosting environment (although you could get this script to work on a Windows based host). Your hosting environment will also need to be able to execute PHP scripts on the server. You can contact your system admin to find this out. Most hosting companies allow server side scripts by default. This script requires PHP Version 4.0.2 to be installed on the server. Do not worry if you do not have this information handy. Most good Web hosting companies update their PHP version regularly, so most likely this is something you will not have to worry about. Now on to the fun!
Step 1: Download phpmail list and Unzip the Archive
You can download PHPMail List at this link.Download Phpmail list free
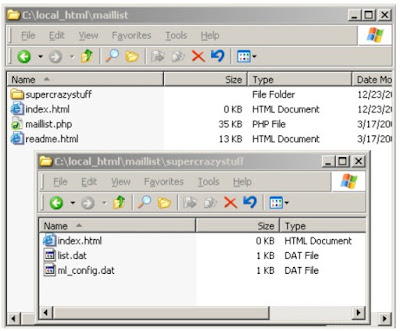
Create a directory on your local hard drive of your Web site and call it “maillist”, and unzip the contents of the “maillist.zip” to this directory.
Step 2: Secure your data
Create another directory outside the “maillist” directory and give it a unique name. This is where you are going to store the mail list data and password information. I named this directory “supercrazystuff” (make sure you give yours a different name for security reasons), and now move these two files from your “maillist” directory into the “supercrazystuff” directory:- list.dat
- ml_config.dat
Step 3: Upload the files to your server.
Upload the files to your server using your favorite FTP program. I use CuteFTP, but any FTP program will do. You can place your “maillist” directory in your root directory on your server. Some Web hosts will not allow PHP (or any other script for that matter) to run outside the CGIBIN directory. Check with your server admin if this is the case for your host. You will need to place just the “maillist” directory into the CGIBIN directory if this is the case.Step 4: Edit the Configuration Setting
Using a simple text editor, you can now edit the configuration settings. I use Notepad on the PC.(You could easily use Macromedia Dreamweaver, or Simple Text on the Mac). Open the “maillist.php” file and find the line that says:
// The full server path to the configuration file.
$config_file = “c:\\path\\to\\ml_config.dat”;
Now change the path to the path of the file on your Web server. If you do not know the full server path, see the help box title “What does “Full server path” mean?” For instance, my server path to the “ml_config.dat” is
/home/stannemi/public_html/maillist/supercrazystuff/
So I would change my server path in the script to look like this:
// The full server path to the configuration file.
$config_file = “/home/stannemi/public_html/maillist/supercrazystuff/ml_config. dat”;
// The full server path to the configuration file.
$config_file = “c:\\path\\to\\ml_config.dat”;
Now change the path to the path of the file on your Web server. If you do not know the full server path, see the help box title “What does “Full server path” mean?” For instance, my server path to the “ml_config.dat” is
/home/stannemi/public_html/maillist/supercrazystuff/
So I would change my server path in the script to look like this:
// The full server path to the configuration file.
$config_file = “/home/stannemi/public_html/maillist/supercrazystuff/ml_config. dat”;
Step 5: Upload and CHMOD the files
Now upload the changed “maillist.php” to the “maillist” directory and ov
erwrite the old file on
the server.
Now CHMOD the files so they have
permission to be edited on the server.
CHMOD is a fancy Unix term for
“change mode”. This is the Unix command and system call to change the access permissions of a named file. You will
want to set the two files in your “supercrazystuff” directory to the following:
• list.dat: CHMOD 666 (or 777 if that fails)
• ml_config.dat: CHMOD 666 (or 777 if that fails)
Most FTP programs will allow you to (right-click if you are using a PC) or (Control-Click on a Mac) to set the file permissions. See your FTP software documentation on how to change file permissions. In CuteFTP on the PC, I just right-click on the file and this dialog box appears, allowing me to set the file permissions.
Step 6: Testing it out
OK, if everything went well, type this URL into your Web browser:
http://www.yourservername/maillist/maillist.php
http://www.yourservername/maillist/maillist.php
And you should see the following screen:
If you see this screen you have successfully installed the script. If you do not see it, or you see an error message like “Could not open configuration file.”, then re-check your full server path. Most likely you have a typo there. If that does not seem to be the problem, and the script says something like “Script Error”, then you may need to try to install the script into your CGI-BIN directory. If all else fails, go online and post your question to one of the many PHP news boards online for help. You will find (as I have) that this community is always willing to help out us newbies!
Step 7: Running the Admin
Now using your Web browser, go to this URL to access the admin (you will want to bookmark
this URL for later use):
http://www.yourservername/maillist/maillist.php?action=admin
The admin login screen will appear. Use the default login and password:
Username: user
Password: pass
You need to change this default login and password NOW! so others will not get into your system.
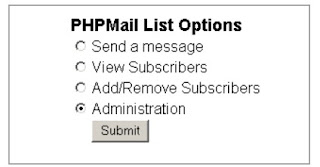
Select the “Administration” radio button, and click the “Submit” button.
You will now see a form field with all of the default settings. You need to change the following settings:
Now change the other variables to match your site (Fig. 2.6). The rest of the program is pretty easy to use. Users can sign up and subscribe to the newsletter if y ou place a public link on your site. The public link would be:
http://www.yourservername.com/maillist/mailllist.php
http://www.yourservername/maillist/maillist.php?action=admin
The admin login screen will appear. Use the default login and password:
Username: user
Password: pass
You need to change this default login and password NOW! so others will not get into your system.
Select the “Administration” radio button, and click the “Submit” button.
You will now see a form field with all of the default settings. You need to change the following settings:
- Username.
- Password.
- List Name.
- The full path to the “list.dat” file (same as your “ml_config.dat” file earlier).
Now change the other variables to match your site (Fig. 2.6). The rest of the program is pretty easy to use. Users can sign up and subscribe to the newsletter if y ou place a public link on your site. The public link would be:
http://www.yourservername.com/maillist/mailllist.php


No comments:
Post a Comment